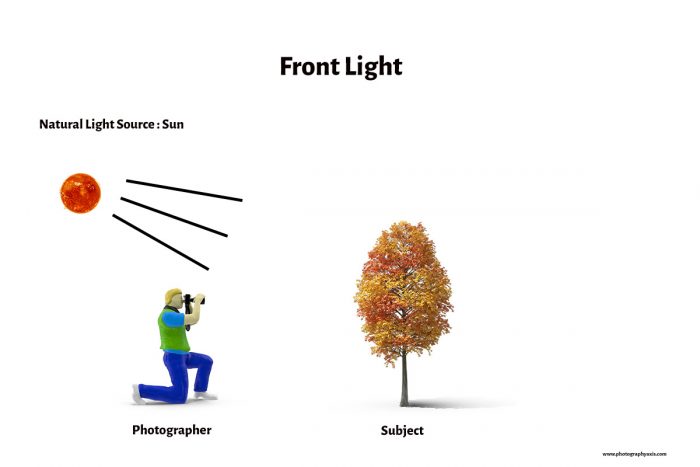
The biggest disadvantage to front light photography is the difficulty in moving the light. You must be very careful not to move the sun. However, you can move the light from a higher location to a lower one to give the subject a diffused look. Another disadvantage of front light is that it shines into the subject’s eyes, so the subject will have a difficult time keeping their eyes open. The butterfly lighting pattern, which is best achieved with natural lighting, can be seen in this photograph.
During sunrise and sunset, the sun will be at an angle. The intensity of the light will be less extreme. During the day, however, the light from the sun is usually at its highest point. The resulting photos will have limited shadows and even lighting. When using front light, try to use a natural source whenever possible. You can use artificial lighting in some situations, but remember that you must pay attention to the position of the sun when shooting natural light.
Should Light Be in Front Or Behind For Photography?
Lighting is a key factor when composing your photos. Place the light in front of your subject if you want a flat picture, while placing it behind your subject will give you a photo with depth and texture. If you are shooting outdoors, you will have to move your subject so that the light is in front of them. This also affects the shadows in your photographs, which creates the illusion of depth.
To create a dramatic look in your photos, direct light is the best choice. Backlighting creates long shadows and silhouettes. You must be very careful while photographing with backlighting, and you might have to use a reflector. You should also be aware of the glare of light on your subject. You can eliminate these problems by using a diffuser to reflect light from the background onto your subject.
There are many ways to manipulate the amount of light on your subject. You can try using a soft box or an oversized mirror to diffuse the light coming from the front. These methods are very similar to those used for backlighting. However, front lighting will give you a flat look without dramatic contrast. This is a great option if you are trying to shoot your child in the dark or have a difficult time finding a good location.
Three Reasons Why Front Lighting Is Important For Landscape Photography
Natural or artificial light is a great option when shooting landscapes. However, front lighting has a few disadvantages. For one, it flattens the scene and eliminates the contrast that gives it depth. It also tends to produce too much shadow, which is less flattering for your subject. Alternatively, you can use side lighting, which creates nice, even shadows across the entire scene. Here are three reasons why you should use front lighting:
Directed sunlight can be an excellent source of light for portraits, but it isn’t very flattering. For that effect, you can use a reflector, which will make your subject appear flat. It’s important to balance the intensity of natural and artificial light when photographing landscapes. For a dramatic look, use both. To balance natural and artificial light, use a large light modifier. This will diffuse the light and soften shadows.
Front lighting is more flattering than back lighting. It illuminates the whole subject, while side lighting flattens the scene and reduces the texture. While it might be flattering in portraits, it can be harsh or too soft and can accentuate a subject’s features. It is possible to control the intensity and direction of front light, and even adjust it to make it more flattering. When it comes to studio photography, front and back lighting are both excellent options.
How to Use Front Lighting in Photography
Front lighting is a popular choice for portraits and gatherings. It flatters older people, as it reduces harsh shadows. It also produces the most flattering two-dimensional images. This type of light can be controlled to create a variety of moods, including moody, romantic, and ethereal. This style is also effective for family portraits. If you’re not sure how to use it, here are some tips:
The key to successful front lighting is to find a balance between natural and artificial light. Using a single light source with a diffuser panel will help you achieve the desired effect. Adding a large light modifier will help you achieve this balance. It will also soften shadows and diffuse light, which is ideal for a portfolio. While front lighting can be easy to use, it is important to experiment with different lighting schemes to get the most out of your photos.
One of the most common examples of front lighting is at the Mammoth Hot Springs in Yellowstone National Park. In this photo, the subject’s face is illuminated by direct sunlight and there are no shadows. This style can be harsh on faces because of the lack of shadows. Because of this, front lighting can cause subjects to appear flat, but it is also great for landscape and portrait photography. It helps create a more even illumination of the subject.
How Do You Define Light in Photography?
There are two main types of light: diffuse and direct. The latter is used to minimize shadows and maximize contrast in an image. In contrast, the former is used to create a mood or environment. There are pros and cons to both types of light, and a photographer will choose whichever works best for his or her work. This article will discuss both. We will start by defining two basic categories of light.
Ambient and artificial light can both contribute to an image. If you’re shooting a landscape, you can try to capture a photo in a shaded area, as this creates a diffuse light that creates a soft glow on your subject. A shaded area also gives your subject a natural look, but can also produce a softer look on a dark subject. These three categories of lighting can make or break an image, so be sure to consider this before using them.
When it comes to natural light, you can’t move the sun, so you have to take into consideration the angle of the sun in the sky. If you shoot from the front, the light will shine directly into your subject’s eyes, causing them to struggle to focus. The butterfly lighting pattern, which produces a distinct shadow under the nose of the subject, is best suited for natural light. By combining these two types of lighting, you can capture a beautiful portrait that has the perfect balance of light and shadow.
The Importance of Light in Photography
Lighting affects a lot of things in a photograph, including the quality and mood of the picture. The direction of the light plays an important role, and the direction of the light source can greatly influence the final image. It is essential for a photographer to understand the different aspects of light before capturing an image. A light source can either be large or small, and the larger the source, the more diffused and soft the resulting light is likely to be. The Sun is the most basic source of all, and is extremely far away from the Earth.
The direction of light is very important to a photograph. The direction of light creates a sense of shape or texture in the image. For instance, how much of the light hits the object in a scene will dictate how much of that shadow appears. In addition, the direction of light will control how dark the subject appears in an image. A photo with low contrast will look flat and lifeless, while a picture with a higher contrast will appear edgy and moody.
Another important aspect of light is its quality. It determines the mood of an image. Using natural or artificial sources of light can make a huge difference in the quality of an image. However, if the light source is too bright or too filtered, it can produce harsh images. To improve the look of a photo, try to use a combination of different types of lights. For example, combining hard and soft lighting is a great way to create a nice-looking photograph.
What Are Practicals in Lighting?
Practicals are useful lighting devices. They are not necessarily meant to light talent, but they can add visual interest. It’s best to reserve these types of devices for the last moment, when you’re ready to use them. They can be as simple as a lamp shade, or as elaborate as a chandelier. Just be sure to use a similar color temperature and shape as the other lights in the scene.
Practical lighting is very useful for storytelling. It’s important to use the right amount of light. When using a desk lamp, for instance, it’s best to use a natural light source. However, if you’re using artificial light to illuminate an interior, it’s best to use an ND gel. An ND gel cuts only the light that is shining into your camera lens, not the light that’s coming from another direction.
Practicals in lighting help create an appropriate mood. Unjustified light in a scene may not make the viewer satisfied with the story, and can also make the story less convincing. Increasingly popular, practical lighting is a great way to add contrast and dimension to a scene. You can use any light source in a practical manner to create new shadows. They’re one of the most popular methods of lighting, and they’re used in a number of movie scenes.
5 Qualities of Light in Front Light Photography
The first property of light is its intensity. It is a measure of how bright something is. The amount of intensity that a particular light source has varies depending on its wavelength and direction. The second property of interest is color. Color is a way to describe the contrast between light and dark objects. The third property of interest is hardness. It refers to the material’s resistance to breakage. It is the hardest material to break.
The direction of light is the third quality of light. It determines the texture and sense of shape of an image. The angle of the sun’s rays makes the shadows appear narrower. In addition, the color of a photo depends on the direction of the light. A photo that uses natural light will have the least amount of shadows. In contrast, a picture taken in the evening will have the most intense light.
The fifth quality of light is the color of the light source. Various types of light can have different colors. The sun’s rays will vary with different angles. The color temperature of a photograph depends on the time of day, the angle of the light source and the intensity of the light. It can also affect the mood of a scene. The fifth quality of a photo is its composition. The color of a photograph is affected by the quality of the light. The lighting in a photo is a reflection of the image.